

Today in the journey of web development learning I have learned the basics of CSS which are CSS module, style tag, embedded style, Named color, Hexcode, Rgb, Background-color, height, width, font, CSS measuring units, CSS id, Class, Apply styles to multiple elements, CSS id vs CSS class, Styling a group of elements, styling a small portion of text, border, border-radius, margin, padding, different ways to set padding and margin, CSS box Model, Text Align, display, inline, block, inline-block, external inline CSS file display inline and block.
Types of CSS
There are three types of CSS. They are.
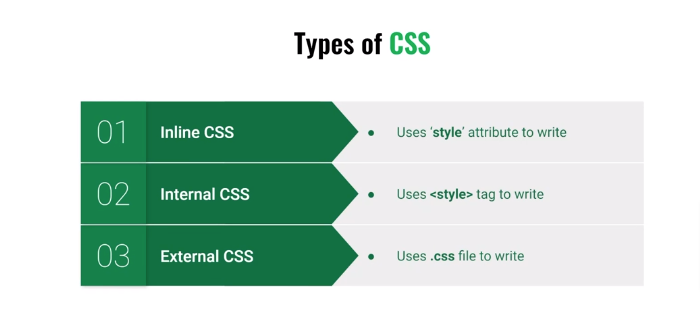
- Inline CSS:
We used to write CSS in the same line of an HTML file. See the example below. I add font size in the paragraph tag by using the “style=” method. This is an inline CSS method.
<h1>This is my favourites</h1>
<p style= "font-size:40px;"> Lorem ipsum dolor sit amet consectetur adipisicing elit. <strong>Lorem ipsum dolor</strong> Sunt earum, reprehenderit blanditiis aspernatur nam magni voluptate deleniti aliquid id harum a corrupti fugit repellendus nobis neque dolorem? Mollitia, sapiente modi!</p>- Internal CSS
You can see the bellow Code. I have added the Style in the header section of the HTML file. Most of the CSS will be written in this style section.
<!DOCTYPE html>
<html lang="en">
<head>
    <meta charset="UTF-8">
    <meta http-equiv="X-UA-Compatible" content="IE=edge">
    <meta name="viewport" content="width=device-width, initial-scale=1.0">
    <title>Explore CSS today</title>
    <style>
        p{
            color: wheat;
            background-color: seagreen;
            height: 30px;
            width: 50%;
            font-size: 18px;
        }
        h1{
            color: #c78347;
        }
        #flower{
            color: violet;
        }
        .food{
            color: black;
        }
    </style>
</head>
<body>
    <h1>This is my favourites</h1>
    <p id="flower">I love rose</p>
    <p>I love orange</p>
    <p class="food">I love biscuits</p>
    <p class="food">I love mango</p>
</body>
</html>- External CSS
In this type of CSS styling, all the CSS codes are written on a different file named as style.css or main.css whatever it is and need to link the CSS file to the HTML by using the linking method. The linking code is below,
<link rel="stylesheet" href="Main-CSS/main.css">
CSS syntax writing style
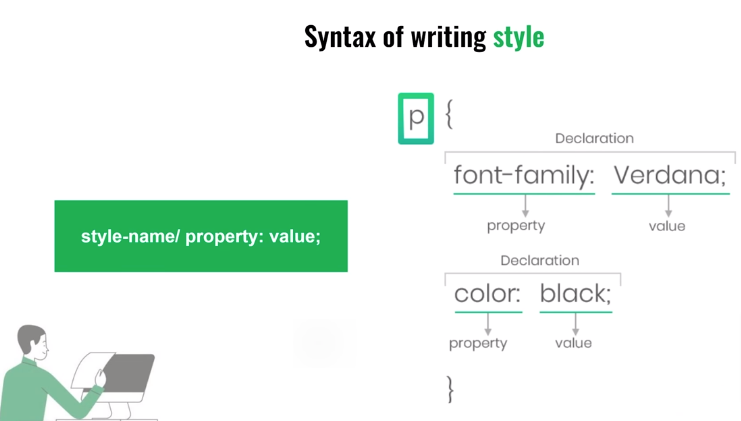
There is a basic rule for writing the CSS.
Class or id {Style-name/ property: value;}
Different types of color/background color in CSS
There are several different ways to specify colors in CSS.
- Color Keywords (140 color names available)
- RGB (Red Green Blue)
- RGBA (this one color with low opacity, alpha channel.)
- HSL (hue, saturation, and lightness)
- HSLA (hue, saturation, and lightness, alpha channel means opacity)
- Hexadecimal (Hex code)
But mostly used color patterns are Hex means Hexadecimal and RGB.
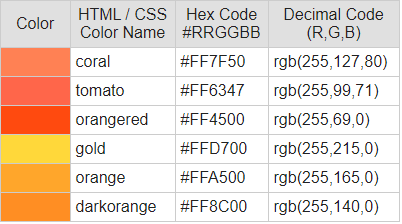
Here is the list of 140 color names.
CSS measuring Units
The most important thing about CSS. It helps to get things in shape.
These are the commonly used measuring units of CSS. But except those there are few other measuring units.
Absolute Lengths Units
Check the below units which are absolute lengths measuring units.
| Unit | Description |
| cm | centimeters |
| mm | millimeters |
| in | inches (1in = 96px = 2.54cm) |
| px* | pixels (1px = 1/96th of 1in) |
| pt | points (1pt = 1/72 of 1in) |
| pc | picas (1pc = 12 pt) |
Relative Lengths Units
These are the relative lengths units in CSS,
| Unit | Description |
| em | Relative to the font-size of the element (2em means 2 times the size of the current font) |
| ex | Relative to the x-height of the current font (rarely used) |
| ch | Relative to the width of the “0” (zero) |
| rem | Relative to font-size of the root element |
| vw | Relative to 1% of the width of the viewport* |
| vh | Relative to 1% of the height of the viewport* |
| vmin | Relative to 1% of viewport’s* smaller dimension |
| vmax | Relative to 1% of viewport’s* larger dimension |
| % | Relative to the parent element |
CSS id vs CSS class (Difference between CSS id & CSS class)
A very important thing to understand while doing CSS is CSS ID and CSS Class and the difference between CSS id and CSS class.
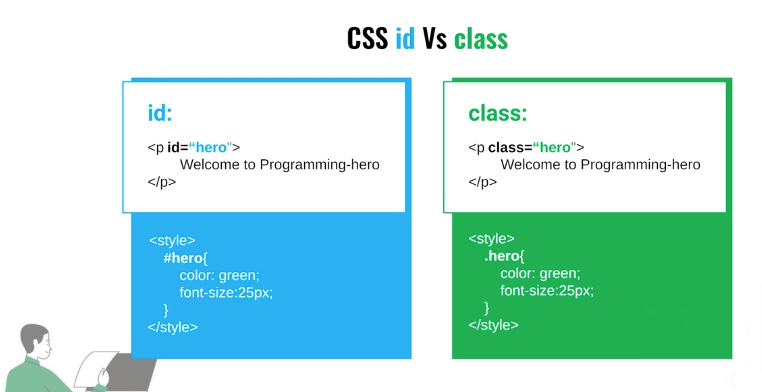
CSS id
It’s mainly student id. It definitely will be a unique one in the HTML file.
If we want to color or stylize a single element we use CSS id to give a separate style to that particular element.
And we use # to style CSS class.
<style>
  #flower{color: violet;}
</style>

    <h1>This is my favourites</h1>
    <p id="flower">I love rose</p>
CSS Class
It exactly represents the classroom. I mean if we want to style a group of things we can use class.
CSS Class can be used multiple times to style multiple elements at a time.
We use (. dot) to start the class styling.
<style>
.food{color: black;}
</style>


    <h1>This is my favourites</h1>
    <p id="flower">I love rose</p>
    <p>I love orange</p>
    <p class="food">I love biscuits</p>
    <p class="food">I love mango</p>
CSS Box Model
The CSS box model is a container that contains multiple properties including borders, margin, padding, and the content itself.

- content: This property is used to display the text, images, etc, that can be sized using the width & height property.
- padding: This property is used to create space around the element, inside any defined border.
- border: This property is used to cover the content & any padding, & also allows to set the style, color, and width of the border.
- margin: This property is used to create space around the element ie., around the border area.
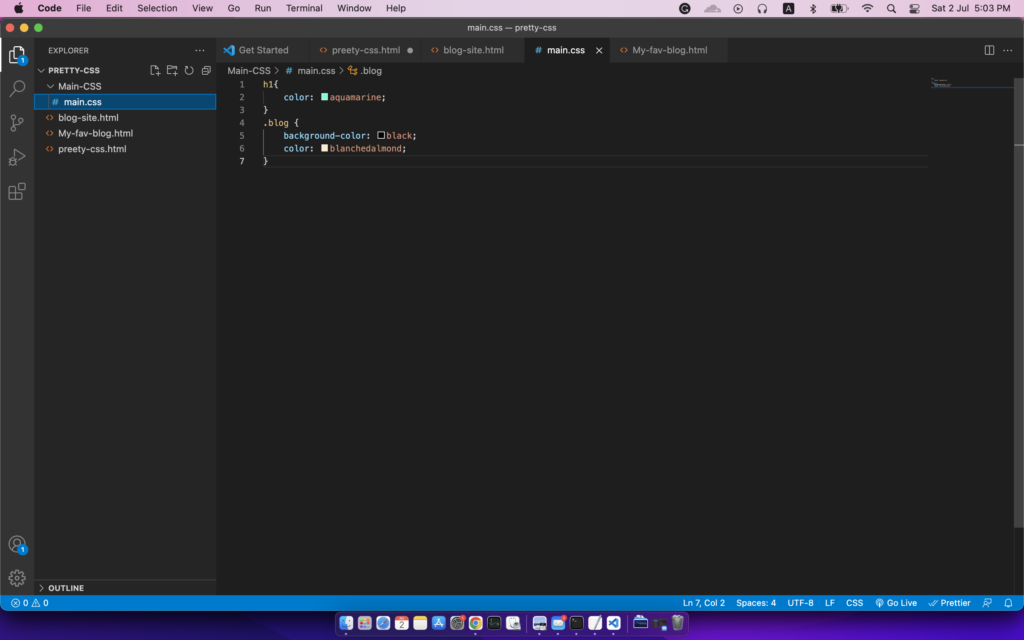
<style>
.blog{
width: 500px;
background-color: cadetblue;
border: 2px solid black;
border-radius: 15px;
padding: 10px;
margin: 30px;
}
.author-name{
color:darkblue;
}
</style>
<div class="blog">
<h1>My third blog</h1>
<small>Authoor - <span class="author-name"> Gtarafdar </span></small>
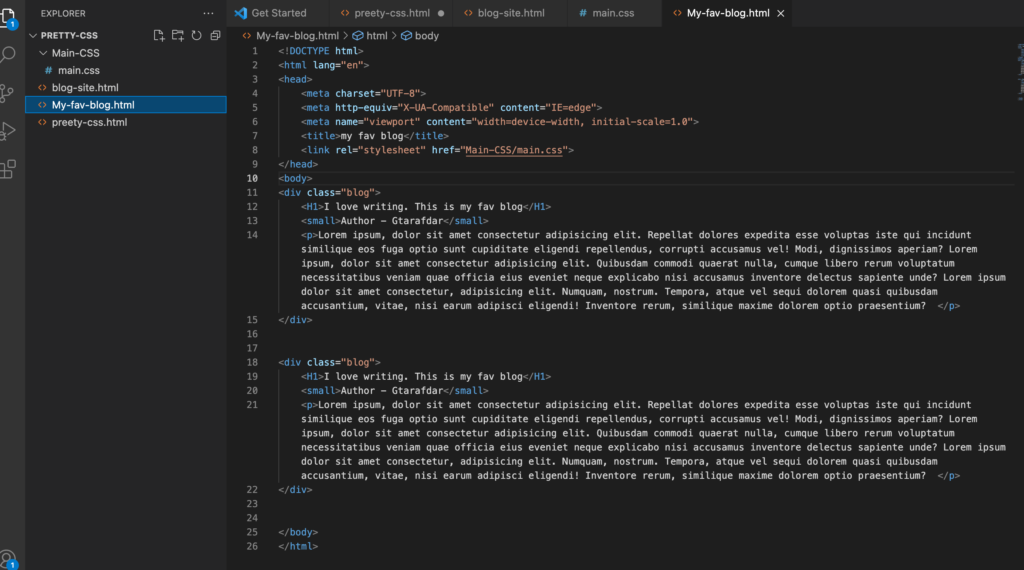
<p>Lorem ipsum dolor sit amet consectetur, adipisicing elit. Nesciunt laboriosam eos minima, ut beatae alias. Earum eaque eveniet, fugiat corporis facilis in possimus impedit atque ea maxime, harum saepe animi!Lorem Lorem ipsum dolor sit, amet consectetur adipisicing elit. Rem, facilis! Consectetur velit distinctio soluta ratione, necessitatibus aliquam nobis maiores esse voluptatum temporibus aliquid natus eos quidem recusandae dolorem, incidunt atque. Lorem ipsum dolor sit amet consectetur adipisicing elit. Maiores aut fugiat earum pariatur cupiditate deleniti voluptas nobis explicabo in placeat quidem asperiores veritatis rerum, inventore rem temporibus quia delectus non.</p>
</div>The total width for the element can be calculated as:
Total element width = width + left padding + right padding + left border + right border + left margin + right margin
The total height for the element can be calculated as:
Total element height = height + top padding + bottom padding + top border + bottom border + top margin + bottom margin
Note: the value of padding, margin, border, and border-radius will always add as clockwise,
> top>right>bottom>left
Read more about the CSS box model here.
Text Alignment in CSS
There are four types of text alignment available in CSS. They are,
- Left
- Right
- Center
- Justify
Check the below codes to get the idea. I use id, class, and div to stylize the whole thing.
<!DOCTYPE html>
<html lang="en">
<head>
    <meta charset="UTF-8">
    <meta http-equiv="X-UA-Compatible" content="IE=edge">
    <meta name="viewport" content="width=device-width, initial-scale=1.0">
    <title>My blog site</title>
<style>
h1{
    text-align: center;
}
.author-name{
    color:darkblue;
    text-align: center;
}

.titles{
    text-align: left;
}

.author-name2{
    text-align: left;
}

.titles1{
    text-align: right;
}

#author-name3{
    text-align: right;
}

.blog{
    width: 500px;
    background-color: cadetblue;
    border: 2px solid black;
    border-radius: 15px;
    padding: 10px;
    margin: 30px;
    text-align: center;
}
.blog2{
    width: 500px;
    background-color: cadetblue;
    border: 2px solid black;
    border-radius: 15px;
    padding: 10px;
    margin: 30px;
    text-align: left;
}
.blog3{
    width: 500px;
    background-color: cadetblue;
    border: 2px solid black;
    border-radius: 15px;
    padding: 10px;
    margin: 30px;
    text-align: justify;
}
.blog4{
    width: 500px;
    background-color: cadetblue;
    border: 2px solid black;
    border-radius: 15px;
    padding: 10px;
    margin: 30px;
    text-align: right;
}
</style>
</head>
<body>
    <div class="blog">
        <h1>My first blog Center align</h1>
        <small>Authoor - <span class="author-name"> Gtarafdar </span></small>
        <p>Lorem ipsum dolor sit amet consectetur, adipisicing elit. Animi qui minima ducimus repellendus explicabo modi veritatis minus! Dicta odio debitis, in ipsa ab soluta, adipisci error ducimus quibusdam tempora ex.Lorem ipsum dolor sit amet consectetur, adipisicing elit. Animi qui minima ducimus repellendus explicabo modi veritatis minus! Dicta odio debitis, in ipsa ab soluta, adipisci error ducimus quibusdam tempora ex.</p>
    </div>

    <div class="blog2">
        <h1 class="titles">My second blog</h1>
        <div class="author-name2"><small >Authoor - <span class="author-name"> Gtarafdar </span></small></div>
        <p>Lorem ipsum dolor sit amet consectetur, adipisicing elit. Nesciunt laboriosam eos minima, ut beatae alias. Earum eaque eveniet, fugiat corporis facilis in possimus impedit atque ea maxime, harum saepe animi!Lorem Lorem ipsum dolor sit, amet consectetur adipisicing elit. Rem, facilis! Consectetur velit distinctio soluta ratione, necessitatibus aliquam nobis maiores esse voluptatum temporibus aliquid natus eos quidem recusandae dolorem, incidunt atque. Lorem ipsum dolor sit amet consectetur adipisicing elit. Maiores aut fugiat earum pariatur cupiditate deleniti voluptas nobis explicabo in placeat quidem asperiores veritatis rerum, inventore rem temporibus quia delectus non.</p>
    </div>

    <div class="blog3">
        <h1>My third blog Justified paragraph</h1>
        <small>Authoor - <span class="author-name"> Gtarafdar </span></small>
        <p> this is justified paragraph. Lorem ipsum dolor sit amet consectetur, adipisicing elit. Nesciunt laboriosam eos minima, ut beatae alias. Earum eaque eveniet, fugiat corporis facilis in possimus impedit atque ea maxime, harum saepe animi!Lorem Lorem ipsum dolor sit, amet consectetur adipisicing elit. Rem, facilis! Consectetur velit distinctio soluta ratione, necessitatibus aliquam nobis maiores esse voluptatum temporibus aliquid natus eos quidem recusandae dolorem, incidunt atque. Lorem ipsum dolor sit amet consectetur adipisicing elit. Maiores aut fugiat earum pariatur cupiditate deleniti voluptas nobis explicabo in placeat quidem asperiores veritatis rerum, inventore rem temporibus quia delectus non.</p>
    </div>

    <div class="blog4">
        <h1 class="titles1">My second blog right align</h1>
        <div id="author-name3"><small >Authoor - <span class="author-name"> Gtarafdar </span></small></div>
        <p>Lorem ipsum dolor sit amet consectetur, adipisicing elit. Nesciunt laboriosam eos minima, ut beatae alias. Earum eaque eveniet, fugiat corporis facilis in possimus impedit atque ea maxime, harum saepe animi!Lorem Lorem ipsum dolor sit, amet consectetur adipisicing elit. Rem, facilis! Consectetur velit distinctio soluta ratione, necessitatibus aliquam nobis maiores esse voluptatum temporibus aliquid natus eos quidem recusandae dolorem, incidunt atque. Lorem ipsum dolor sit amet consectetur adipisicing elit. Maiores aut fugiat earum pariatur cupiditate deleniti voluptas nobis explicabo in placeat quidem asperiores veritatis rerum, inventore rem temporibus quia delectus non.</p>
    </div>
</body>
</html>Note: For the <small> tag I have to use a different <div> to make it align with the heading. Otherwise, it will not work properly.
What is Div then?
Div is an HTML element or tag. While styling a small group of items at a time we need to cover it as <div></div>. All the elements will be inserted in the div to give the same style at a time.
For example, if we want to give a Background color of a heading, small line, and a paragraph then we have to use div. And we have to add a class in a dive to style it.
<style>
h1{
    text-align: center;
}
.author-name{
    color:darkblue;
}

.blog{
    width: 500px;
    background-color: cadetblue;
    border: 2px solid black;
    border-radius: 15px;
    padding: 10px;
    margin: 30px;
    text-align: center;
}
</style>

<div class="blog">
        <h1>My first blog Center align</h1>
        <small>Authoor - <span class="author-name"> Gtarafdar </span></small>
        <p>Lorem ipsum dolor sit amet consectetur, adipisicing elit. Animi qui minima ducimus repellendus explicabo modi veritatis minus! Dicta odio debitis, in ipsa ab soluta, adipisci error ducimus quibusdam tempora ex.Lorem ipsum dolor sit amet consectetur, adipisicing elit. Animi qui minima ducimus repellendus explicabo modi veritatis minus! Dicta odio debitis, in ipsa ab soluta, adipisci error ducimus quibusdam tempora ex.</p>
    </div>
Discussion of CSS Display: inline, block, inline-block
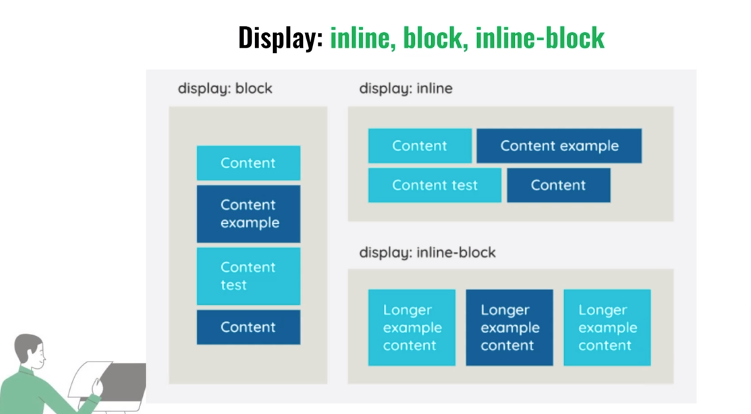
Every HTML element has a default display value, depending on what type of element it is.
There are two display values: block and inline.
Block-level Elements
A block-level element always starts on a new line, and the browsers automatically add some space (a margin) before and after the element.
Two commonly used block elements are: <p> and <div>.
Inline Elements
An inline element does not start on a new line.
An inline element only takes up as much width as necessary.
This is a <span> element inside a paragraph.
Difference Between Inline and Block Elements in HTML
| Block Elements | Inline Elements |
| Block elements always start from a new line. | Inline elements never start from a new line. |
| Block elements cover space from left to right as far as it can go. | Inline elements only cover the space as bounded by the tags in the HTML element. |
| Block elements have top and bottom margins. | Inline elements don’t have a top and bottom margin. |
| Examples of block elements – <p>,<div>,<hr> . | Examples of inline elements – <span>,<br> |
| Block elements accept all the margins, including left, right, top, and bottom margins. Hence the elements are created easily with no margin constraints. | Inline elements accept only left and right margins and do not accept top and bottom margins. |
| Width and height are considered, and they expand in terms of width, height and borders mainly. This helps the files to find space of their own. | Width and heights are not considered in inline elements. The inline elements do expand in a way to accommodate other elements but not in terms of width and height. |
To learn more about inline and block element differences read here and here.
Final thought of today’s basic CSS learning
That’s it about today’s basic CSS learning in the journey of becoming a web developer. These are the basics of CSS. I hope it will help us in future learning.